

There’s nothing like a relaxing family beach getaway to relax and make memories together. Just the thought of feeling the mild ocean breeze and the soft sand under your toes while the children play in the water building sandcastles is enough to put a smile on anyone’s face!
The good news is, when it comes to finding the quintessential beach getaway that will satisfy the whole family, the options are endless. Whether you’re looking to stay domestic or add a stamp to your passport, there are countless family beach vacation options that make for the ultimate getaway.
Here’s our roundup of the best beach vacations for families who love the sand and sun.
Best Beach Vacations for Families in the United States
San Diego, California
Set along the Pacific Ocean, San Diego has plenty of family-friendly beaches that make for the ultimate west coast beach vacation. In fact, they’re some of the best in the country.
Ranked one of the most family-friendly beach destinations, the sandy Coronado Beach has tide pools for the littlest travelers to splash around and waters perfect for surfing, swimming and boogie boarding. At the north end of the beach is a dog-friendly area, so you can bring your furry family members along!
Also popular is the La Jolla coastline, home to La Jolla Shores, Torrey Pines State Beach and Mission Bay Park. Families can easily pass the day participating in fun water sports such as kayaking, paddleboarding and water skiing, or just strolling along the boardwalk. The beaches are staffed by lifeguards year-round, so you can feel comfortable knowing that someone else has an eye on your little ones.
Family-approved places to stay near San Diego: Hotel del Coronado, Loews Coronado Bay Resort, La Jolla Shores Hotel

Clearwater Beach, Florida
Voted the best beach town in Florida, Clearwater Beach is a small, family-friendly beach destination with beautiful, soft white sands and picturesque views. There’s plenty to do for all ages both in and out of the water, easily making Clearwater one of the best beach vacations for families.
Because of its calm waters, water sports are a big draw at this beautiful beach, with activities such as jet skiing, paddleboarding and parasailing available year-round. Kids will love the Clearwater Marine Aquarium where they can view rescued sea turtles, dolphins and other sea life. The beachfront promenade is a great place to take a stroll, ride a bike, grab a bite to eat or do some shopping. The free nightly festival at Pier 60 is a great place to catch a sunset with the family. SheBuysTravel contributor Breeze Leonard also recommends a visit to Moccasin Lake Nature Park. In her words, “Hiking down a few nature trails and seeing the wildlife present at this park was a much cooler experience than I had anticipated.”
There are also plenty of boat tours and excursions, such as sightseeing tours, a pirate cruise and a dolphin cruise. A cocktail and dinner cruise for mom and dad is a perfect way to end the day. And for families looking to get in some Disney time during their beach vacation, Disney World Resort is just a 90-minute drive away.
Family-approved places to stay near Clearwater: Hyatt Regency Clearwater Beach Resort & Spa, Sheraton Sand Key Resort, Sandpearl Resort

Destin, Florida
Located on Florida’s panhandle, Destin is known for its beautiful Gulf of Mexico beaches, boardwalk and top-notch golf courses. There are also plenty of family-friendly beachfront resorts where both adults and kids can sit back, relax and have the vacation of their lives.
Henderson State Beach Park is one of the area’s top attractions with 30-foot white sand dunes, emerald waters, campsites and nature trails. Water loving kiddos like my 9-year-old son could probably spend all day at Big Kahuna’s indoor and outdoor waterpark, offering 60,000 square feet of water attractions including water slides, a lazy river, thrill rides and mini golf. There are also many boat tours available, from dolphin watching tours to island adventure tours.
SheBuysTravel Tip: One of our favorite things to do when taking a beach vacation is to hire a photographer for family photos. This is a special gift and souvenir that we cherish. We use Flytographer to book a local photographer located in the area that we’re traveling to. Use this link and you will get $25 off your photo session.
Family-approved places to stay near Destin: Henderson Beach Resort, Hilton Sandestin Beach Golf Resort & Spa, Sandestin Golf and Beach Resort

Sanibel Island, Florida
For a laid-back island beach vacation that you can enjoy with kiddos of all ages, head to Sanibel Island, Florida. Whether you want to spend your days building sandcastles on the beach or sightseeing and enjoying nature and wildlife, Sanibel Island is the place where you can do both.
The popular Tarpon Bay Beach is the place to be for water activities such as swimming, fishing, kayaking and paddleboarding. The calm beach waters are ideal for little ones to splash around and collect unique seashells. And when you’re ready to take a break from the water, The J.N. Ding Darling National Wildlife Refuge is a great place to take a bike ride, do some bird watching and take in all that nature has to offer.
Family-approved places to stay near Sanibel Island: Sanibel Island Beach Resort, Sunshine Island Inn, Sundial Beach Resort & Spa
Seaside, Florida
Named the “Best Beach on Earth” for families by Travel + Leisure Magazine, it is no surprise that Seaside, Florida is among the best beach vacations for families. Seaside is a small, charming town where families can really focus on rest and relaxation. Not only is it walkable and right on the water, but it is home to some of the most beautiful, white sand, turquoise beaches in Florida.
Famous for its pastel-colored houses with classic porches and white picket fences, Seaside, Florida is a beauty to stroll through. Although easily walkable, there are also bike and golf cart rentals to help you get around town. When not spending your day at the beach in the sun and sand, head to the Grayton Beach State Park to admire the coastal sand dunes, hike the trails with the family or take in the beauty of the surrounding wildlife. At the end of a busy day, head to the town square to grab a bite to eat, do some shopping or cool down with some delicious ice cream.
Family-approved places to stay near Seaside: Hilton Sandestin Beach Golf Resort & Spa, Sandestin Golf and Beach Resort, Watersound Inn

Maui, Hawaii
For an unforgettable Hawaiian vacation with the family, there’s no doubt that Maui, Hawaii needs to be on the top of your list. Maui is a top beach vacation destination for families, honeymooners and single travelers. It is home to some of the most beautiful, calm water beaches, upscale resorts and plenty of cultural and tourist activities for all ages.
Families who love the outdoors will have a blast snorkeling, kayaking, sailing, parasailing, surfing and canoeing on Maui’s many breathtaking beaches, including Wailea Beach, one of the most popular beaches in the world. Ka’anapali Beach is where both beginner and pro surfers can go to catch some of the best waves. The Makena Beach State Park houses one of the largest undeveloped beaches on the island and has picnic tables, restrooms and lifeguards to make for a comfortable beach day with the family. And a trip to Maui won’t be complete without a trip to Haleakala National Park, where you can catch a view of the world’s largest dormant volcano among other tropical and endangered wildlife.
Family-approved places to stay near Maui: Hyatt Regency Maui Resort & Spa, Ka’anapali Beach Hotel, Sheraton Maui Resort and Spa
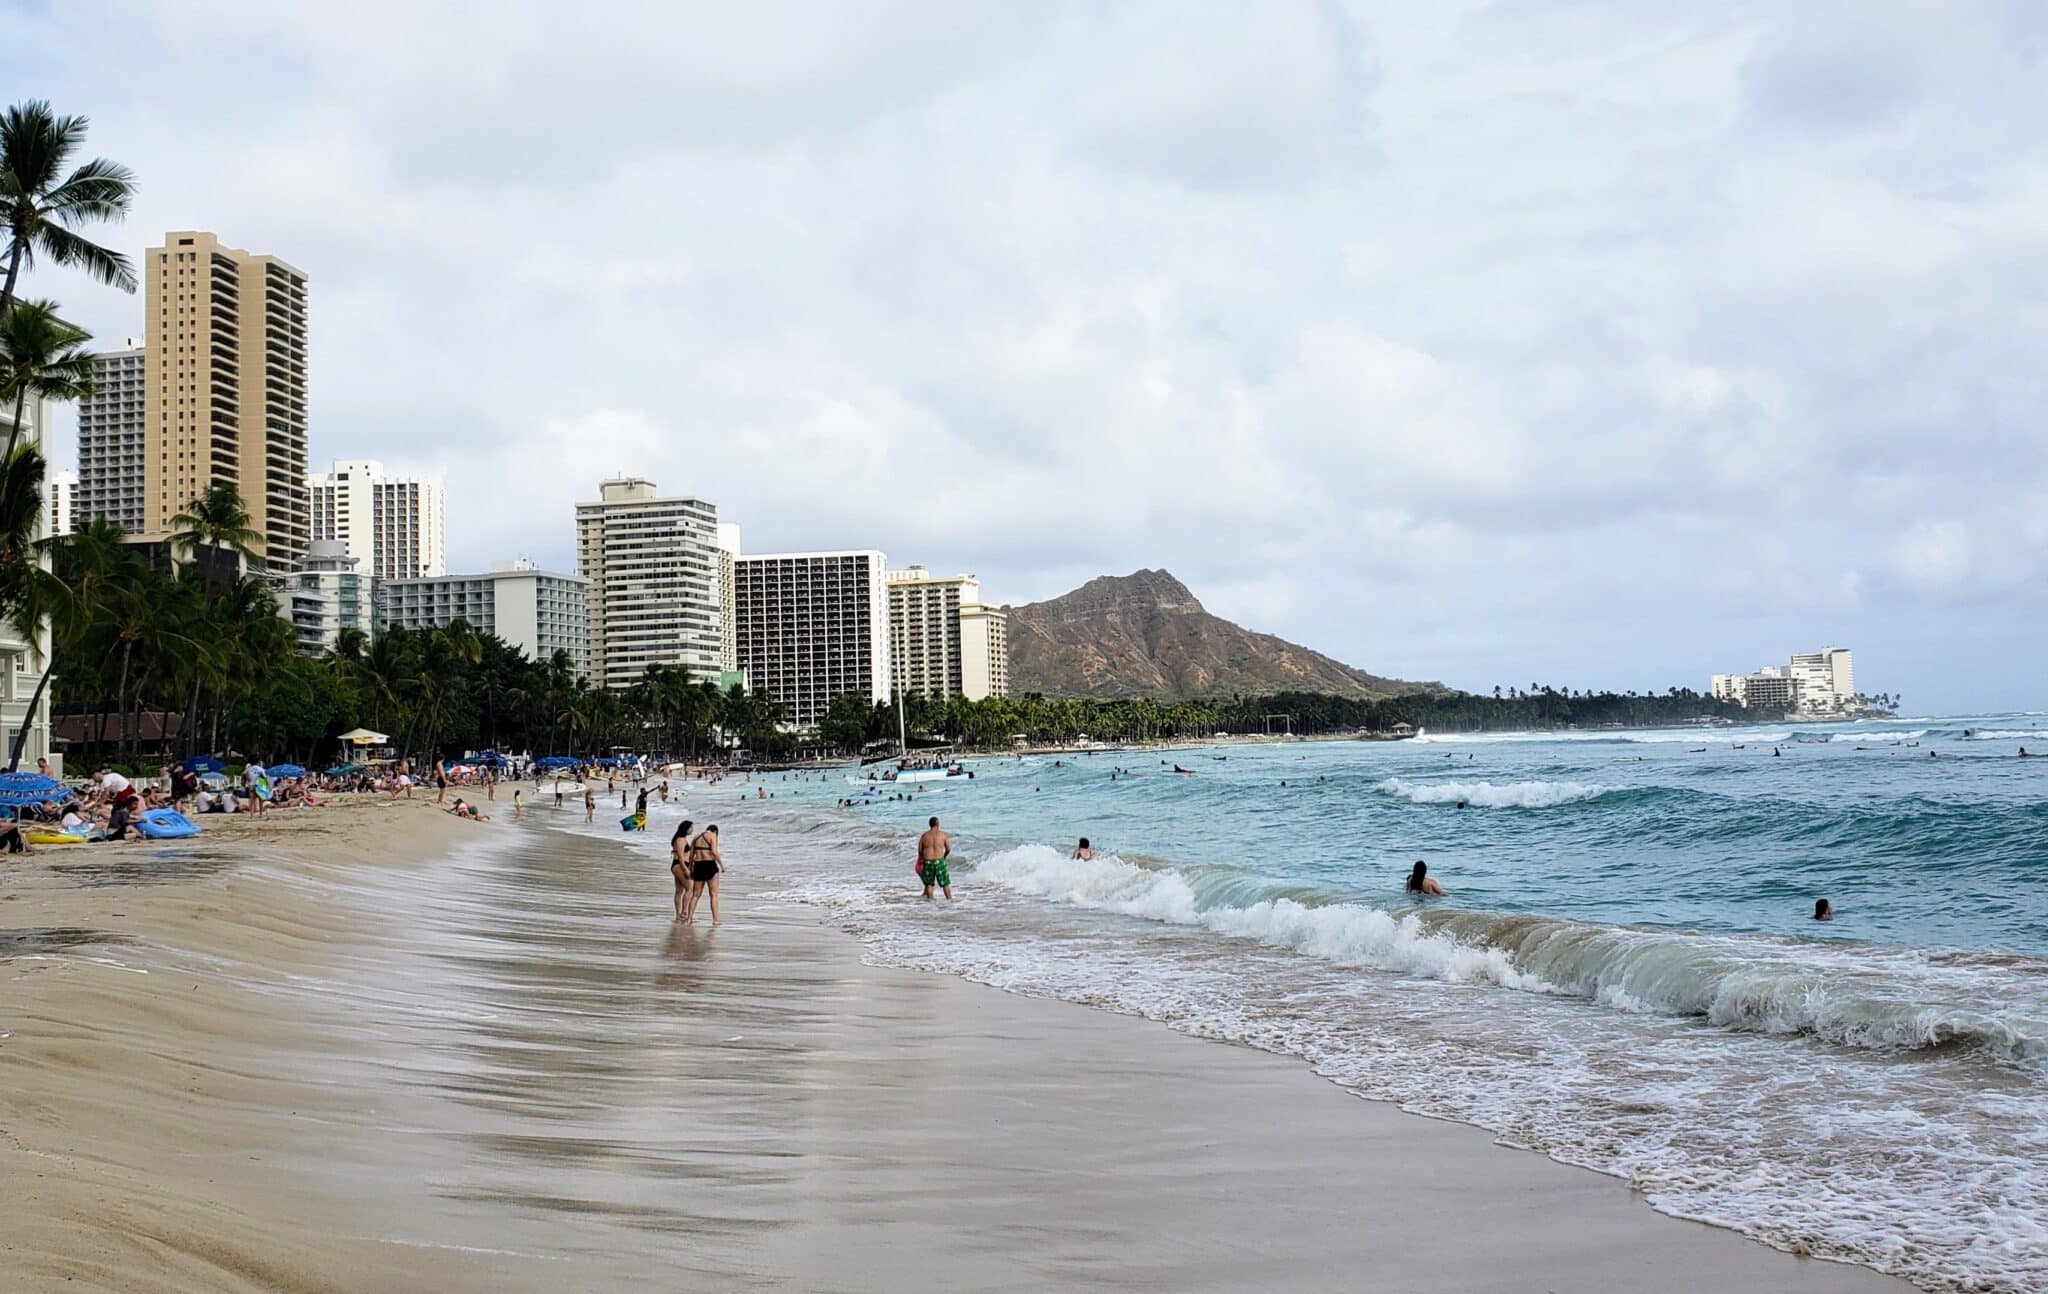
Oahu, Hawaii
The third largest and most visited island in Hawaii, Oahu is another great pick for families who love beautiful world-class resorts, beaches and surfing. With high rise hotels lining the beach, you won’t have to go far to enjoy the fun, sun and sand.
Oahu is where you’ll find Waikiki Beach, an iconic world-famous beach with calm waters perfect for the youngest family members to swim and splash around. The North Shore of Oahu is the place to be if you want to catch some big waves for surfing. SheBuysTravel contributor Mimi Slawoff recommends taking surf lessons at the Hans Hedemann Surf School, a fun activity for the whole family. For families with younger kids, the Hanauma Bay Beach Park nature preserve is a great place to spend the day snorkeling and exploring the Hawaiian sea life in a safe environment.
Oahu is also the site of Pearl Harbor, so after spending some time at the beach, head over to the USS Battleship Missouri Memorial and USS Arizona Memorial for an unforgettable history lesson. However, you may want to reserve that part of the trip for the older kids. Some parts may not be appropriate for children under the age of four!
Family-approved places to stay near Oahu: Hilton Hawaiian Village Waikiki Beach Resort, Aulani, A Disney Resort & Spa, Turtle Bay Resort
Ogunquit and Kennebunkport, Maine
Maine isn’t usually regarded as a top beach destination due to its rocky coastline, but Ogunquit and Kennebunkport in southern Maine offer wide stretches of sandy beaches that are popular among families. It is no doubt one of the best beach vacations for families looking for a tranquil vacation.
Ogunquit Beach sits on a peninsula between the Atlantic Ocean and Ogunquit River and is an excellent place to head with the family during the summer months. The lifeguard-staffed beach is long and flat, making it an ideal place for little ones to swim. It is also a great place for sunbathing, picnicking and watching the sunset. Outside of the water, the mile-long Marginal Way trail is a great place for a relaxing family stroll. It starts in downtown Ogunquit and takes walkers down the coast to the charming Perkins Cove, offering breathtaking views of the rocky coast along the way. There are also several benches along the way for when little legs get tired.
Kennebunkport is a small historic fishing village also known for its incredible beaches and picturesque lighthouses. It is also a great place to try one of Maine’s famous lobster rolls, among other locally sourced fresh seafood! The wide and sandy Goose Rocks Beach stretches three miles and is a wonderful place to swim, play, build sandcastles or take a walk. Colony Beach (a/k/a Arundel Beach), is a smaller sand and pebble beach great for taking a walk or swim. You can also bring your furry family member. However, there are no bathrooms, so plan accordingly!
Family-approved places to stay near Ogunquit and Kennebunkport: Anchorage by the Sea, The Admiral’s Inn, Nonantum Resort, Boathouse Waterfront Hotel & Marina

Cape Cod, Massachusetts
Cape Cod has long been one of the best beach vacations for families in New England, and for a good reason. With 15 picturesque towns and beautiful villages, this hook-shaped peninsula offers plenty to do for families of all ages.
Cape Cod is known for its pristine beaches and sand dunes, whale-watching, mouthwatering lobster rolls and endless outdoor activities. Kalmus Park Beach in Hyannis is popular for swimming and windsurfing. There is also plenty of space for the kiddos to run around and play. Sandy Neck Beach in Barnstable offers shallow tidal pools, sand dunes and a wooden boardwalk for bike riding or taking a stroll. Both beaches offer parking, lifeguards, restrooms and a snack bar, making it easy to spend the whole day relaxing.
For a fun day trip for the whole family outside of Cape Cod, head south and take the ferry to Nantucket Island. There you can bike around town or spend a day splashing around in the calm, shallow waters of Children’s Beach. There’s even an Ice Cream cruise where you can cruise around the harbor while enjoying a delicious frozen treat!
Family-approved places to stay near Cape Cod: Chatham Bars Inn, Sea Crest Beach Hotel, Cape Codder Resort & Spa

Myrtle Beach, South Carolina
Growing up, Myrtle Beach was always a popular beach getaway destination for my family and friends. No matter what our age, there was something fun for everyone to do – it was nearly impossible for anyone to complain that they were “bored!” To this day, it is still one of the best beach vacations for families on the east coast.
Myrtle Beach is a classic beach vacation destination for families looking for a relaxing, laid back getaway that will satisfy the whole family. It is known for its busy boardwalk, lined with restaurants, live entertainment and numerous attractions for all ages. In addition to its more than 60 miles of shoreline, there are more than 50 mini golf courses, old-fashioned arcade games and popular attractions such as the Ripley’s Aquarium. Myrtle Beach State Park is a family must-visit, with opportunities for fishing, crabbing, picnicking, camping and shopping.
Family-approved places to stay near Myrtle Beach: Marriott Myrtle Beach Resort & Spa at Grande Dunes, Breakers Resort, Dunes Village Resort

Outer Banks, North Carolina
Undoubtedly one of the summer’s best beach vacations for families on the east coast is the Outer Banks. This set of barrier islands off the coast of North Carolina is especially great for families who like to stay active during their beach vacation.
The Outer Banks is an angler’s paradise, with opportunities to fish, take a fishing boat tour, go crabbing and go shrimping. At Jeannette’s Pier in Nags Head, the whole family can take a fishing class together and observe native fish species at the aquarium. Days at the beach are best spent on the sandy shores of Nags Head, Kitty Hawk and Kill Devils Hill. For families traveling with their furry family members, Duck is the place to be.
On Hatteras Island, you can view the Cape Hatteras Lighthouse, the tallest lighthouse in the United States. Horse lovers will want to head to Corolla and Carova Beach. There you can see wild horses roaming free in their natural habitat.
Family-approved places to stay near Outer Banks: Surf Side Hotel, Sea Ranch Resort, Beachwoods Resort

Hilton Head, South Carolina
Known for its beaches and golf courses, Hilton Head Island certainly earns its place as one of the best beach vacations for families. With plenty to do and see beyond the beach, your family will be busy for hours.
Coligny Beach Park, Hilton Head’s most popular oceanfront park, has everything your family needs to enjoy a day at the beach. In addition to beach access, there are paths for walking and biking, bike rentals and swings. For your convenience, there are also bathrooms, outdoor showers and changing rooms. There’s even wifi to stay connected and share all of your incredible beach vacation photos and videos. The less crowded Alder Lane Beach is a great place to spend the day with your furry family members.
When you’re done with the sun and sand, take the family to get their dose of nature and wildlife at the Coastal Discovery Museum or the Pinckney Island National Wildlife Refuge. At the end of a busy day, head to the Harbour Town Lighthouse and Museum to catch a beautiful sunset.
Family-approved places to stay near Hilton Head: Disney Hilton Head Island Resort, Sonesta Resort Hilton Head Island, Omni Hilton Head Oceanfront Resort

Virginia Beach, Virginia
Virginia Beach is a consistent #1 family beach vacation spot for families. With nearly 40 miles of golden sand beaches and a bustling boardwalk packed with fun things to do and see, it is one of the best beach vacations for families on the east coast whether you are looking for “thrill” or “chill”.
My fondest memories of Virginia Beach as a child are from the hours we would spend playing in the water and building sandcastles. To this day, it is still one of the best ways to spend the day. Bike rentals are available to explore the three-mile boardwalk, lined with restaurants, ice cream shops, arcades and shops. If you’re feeling adventurous, head to the seasonal Atlantic Fun Park, a family-friendly amusement park with thrill rides, go-karts, games and food. Don’t leave without a visit to the massive King Neptune statue, the perfect place for your family vacation photo op.
Family-approved places to stay near Virginia Beach: Coastal Hotel & Suites Virginia Beach – Oceanfront, Holiday Inn & Suites North Beach, The Founders Inn & Spa
Best Beach Vacations for Families in the Caribbean

Nassau, Bahamas
If you’re looking to head to the Caribbean islands for your family beach getaway, the Bahamas should be at the top of your list. With year-round warm temperatures, powdery white sand beaches, turquoise waters and numerous attractions, it has rightly earned its place as one of the best family beach vacations.
Nassau is the place to be for water lovers. In addition to its many picturesque beaches (including the popular postcard-worthy Cable Beach), there are plenty of water sports and activities to enjoy, such as coral reef snorkeling, interacting with dolphins in their natural habitat, and even swimming with pigs! Downtown Nassau is lined with colorful colonial architecture, top-of-the-line shopping and delectable local cuisine. Nassau is also home to historic attractions such as Fort Charlotte, the largest of the three forts on the island.
My personal favorite part of Nassau is Paradise Island, home to the jaw-dropping Atlantis resort (an absolute must-see for families). There you’ll find an incredible water park with thrilling water slides, a lazy river, an impressive aquarium, and 17 world class restaurants to satisfy every family member’s palette!
SheBuysTravel Tip: On a budget? The Comfort Suites Paradise Island offers an affordable family beach vacation with full access to the Atlantis Resort and all of its amenities!
Family-approved places to stay near Nassau: Comfort Suites Paradise Island, Melia Nassau Beach, Breezes Resort Bahamas All-Inclusive

Cancun, Mexico
Another one of the top picks for the best beach vacations for families is in the stunning and lively beach town of Cancun in Quintana Roo, Mexico. Cancun was the first place I traveled with my son when he was just three years old. One full week still was not enough time for all of the fun things there were for us to do!
In addition to its numerous family-friendly beach resorts with super fun kids clubs, tennis courts, golf courses and water sports galore, there are also plenty of off-resort acitivites to enjoy. My son absolutely loved the interactive aquarium and riding golf carts around Isla Mujeres. The Captain Hook Pirate Dinner Cruise, Dolphin Discovery and All Ritmo Water Park are also hits among kids of all ages. And when you want to venture outside of Cancun, the popular Xcaret Park and city of Playa del Carmen are just a day trip away!
Family-approved places to stay near Cancun: Moon Palace Cancun, Fiesta Americana Condesa Cancun All Inclusive, Hard Rock Hotel Riviera Maya
Leave a Reply